aws-cognito
FIDO2 Security OR Passkey Functionality
[!NOTE] Last Updated: 2026-07-31
This package provides the FIDO2 Security Keys OR Passkey based functionality. This is a passwordless authentication approach, where the user can use the security key or passkey to authenticate.
[!IMPORTANT] We have released the laravel blade components as a feature from V2.0.6. These view components have php/html blade code and javascript functions to implement the FIDO2 Security Keys OR Passkey based functionality within your application. All FIDO2 Security features are supported.
Contents
- Introduction
- Configurations
- Features
- Quick Start
- Advanced Topics
- References
Introduction
This package feature provides the FIDO2 Security Keys OR Passkey based functionality. This is a passwordless authentication approach, where the user can use the security key or passkey to authenticate.
This is a Zero-Knowledge Authentication method. The approach uses a physical or a virtual device (i.e. laptop or mobile device). The passkey is a software-based certificate that is stored on the user’s device and can be used for authentication.
The AWS Cognito currently provides following methods:
- EMAIL OTP
- SMS OTP
- Device based Biometric Authentication (i.e. Touch ID, Face ID)
Configurations
AWS Configurations
In order to use the FIDO2 Security Keys OR Passkey based functionality, you need to configure the AWS Cognito User Pool with the necessary settings.
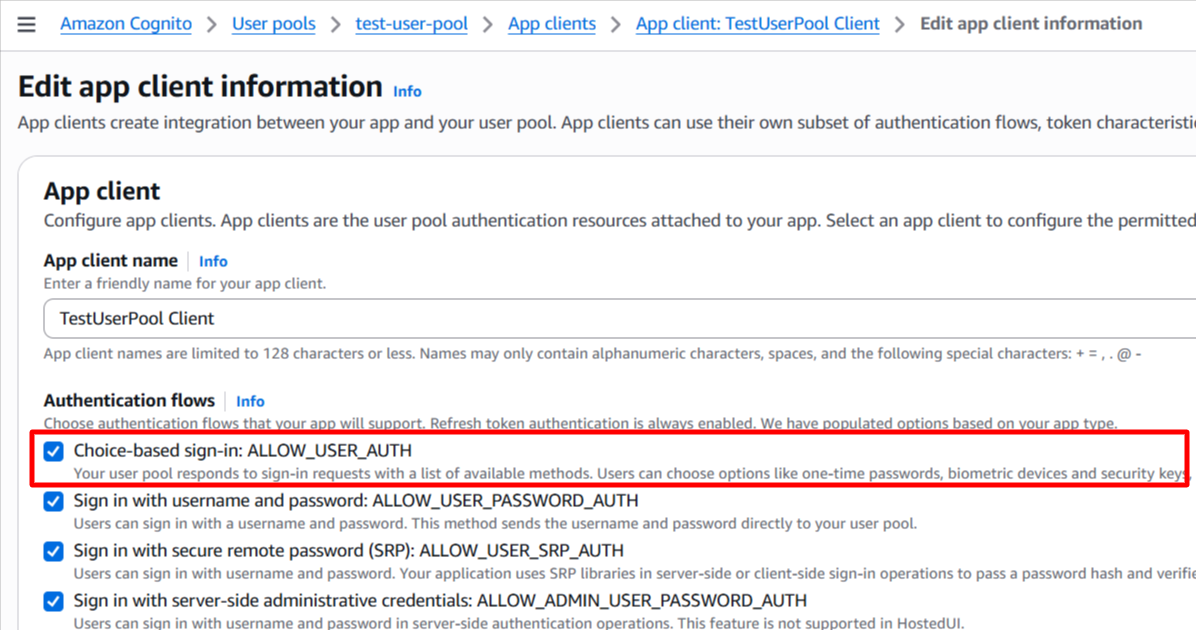
Step 1: Select the App Client in the AWS Cognito User Pool
Step 2: Enable the FIDO2 Security Keys OR Passkey based MFA functionality in the Sign-in experience settings
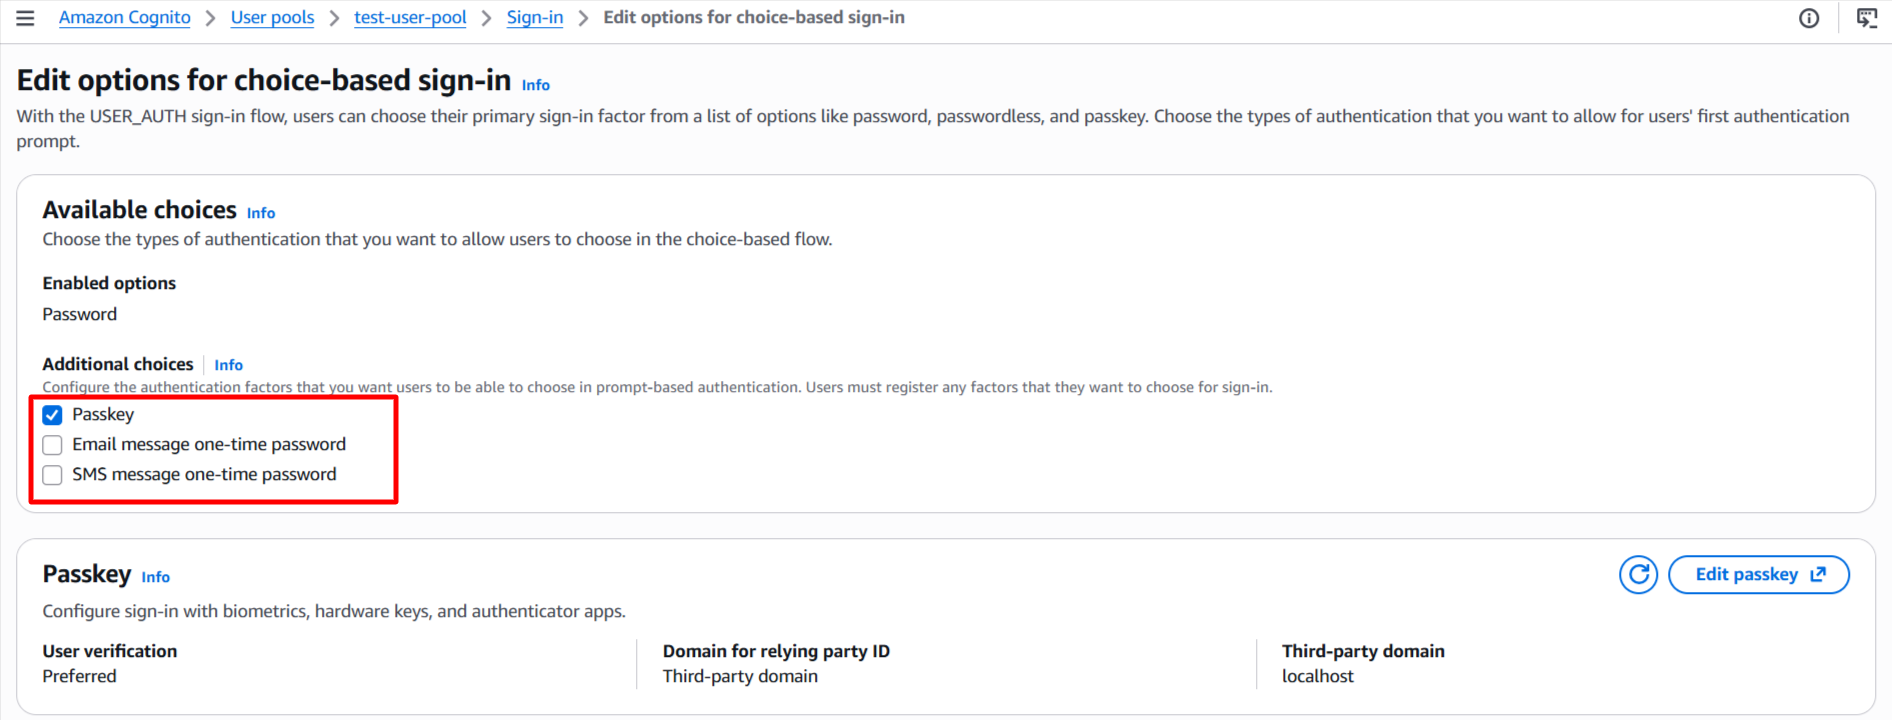
AWS Cognito provides the FIDO2 Security Keys OR Passkey based functionality, with multiple choices. This data is dynamically provided from the trait making the user experience better.
Step 3: Set the Authentication flow settings for passkey based authentication
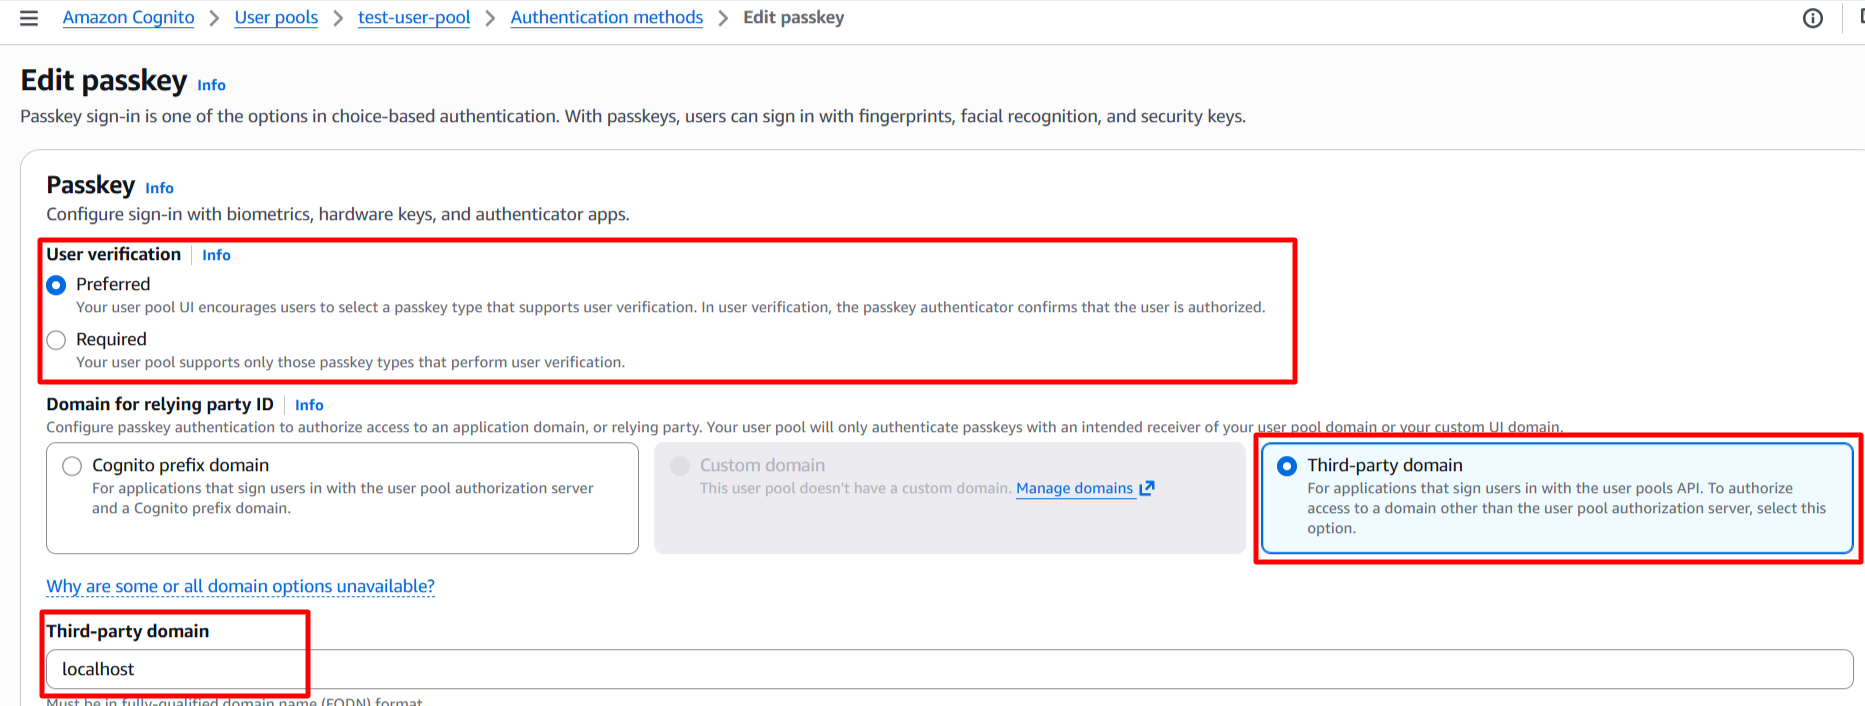
[!TIP] During the development phase, you can set the server domain as
localhost.
This will be used as the relying party id for the FIDO2 Security Keys OR Passkey based authentication.
In the production environment, you need to set the server domain as the domain name of your application.
This is required for the FIDO2 Security Keys OR Passkey based authentication. The relying party id is used to identify the application during the authentication process.
Laravel Configurations
The package allows some configurations, which can be set in the .env file. The default values are set in the configuration file. You can change the default values by setting the keys in the .env file.
Configure below keys into the .env file to change the default values.
- The
AWS_COGNITO_ALLOW_PASSKEYSshould be set to true to enable the passkey feature. The default value is false resulting into disabled passkey functionality. - The
AWS_COGNITO_WEB_AUTHN_FACTOR_CONFIGURATIONcan have values MULTI_FACTOR_WITH_USER_VERIFICATION (default) or SINGLE_FACTOR.[!NOTE] More details are available in the configuration file with the key
web_authn_mfa_configuration. - The
AWS_COGNITO_WEB_AUTHN_RELYING_PARTY_IDis the domain name of the application. This is required for the FIDO2 Security Keys OR Passkey based MFA functionality. The default value islocalhost. -
The
AWS_COGNITO_WEB_AUTHN_USER_VERIFICATION_METHODcan have valuespreferred(default),requiredordiscouraged. More details are available in the configuration file with the keyweb_authn_mfa_configuration.The provider configuration aids to send out the SMS from AWS with additional costs. Refer AWS SNS pricing for more details AWS SMS Pricing
AWS_COGNITO_ALLOW_PASSKEYS=true
Features
Blade Component (web app)
The package provides a blade component for passkey management and passkey authentication. The passkey authentication component is integrated into the challenge component.
Passkey Management Functionality
The package provides a blade component that you can use to implement the passkey registration functionality in your pages.
You can use the component in your blade files as shown below. The component has all the required scripts, routes and methods to implement the passkey registration functionality in your application. The component uses the WebAuthPasskey trait, which provides the necessary methods to implement this functionality in your application.
...
@section('content')
    <x-cognito::common.js-scripts />
    <x-cognito::passkey-webauthn />

    ...
    ...

    @stack('cognito-common-scripts')
    @stack('cognito-passkey-webauthn-scripts')
@endsection
...
You can also use simple html buttons or any element with the data attributes to trigger the passkey registration functionality as shown below.
The data attributes are used to trigger the necessary javascript functions to implement the passkey registration functionality in your application. The data attributes are as follows:
data-role: This attribute is used to identify the element that will trigger the passkey functionality role. The value of this attribute must be passkey-webauthn.data-action: This attribute is used to identify the action that will be performed when the element is clicked. The value of this attribute can be register or delete.- The
registervalue is used to trigger the passkey registration functionality, and - The
deletevalue is used to trigger the passkey deletion functionality.
- The
<button data-role="passkey-webauthn" data-action="register">
    Register Passkeys</button>

<button data-role="passkey-webauthn" data-action="delete">
    Delete Passkeys</button>
Passkey Authentication Functionality
The package provides a blade component that you can use to implement the passkey login functionality in your challenge page.
<form id="auth-challenge-form" method="POST" ...>
    ...
    <!-- pass the form name provided as a parameter to the component -->
    <x-cognito::challenge
        :challenge-form-name="'auth-challenge-form'" />
    ...
    ...
    @php
        $data = (session('data')) ?? null;
        $challengeNameValue = 'NONE';

        if ($data && isset($data['status']) && $data['status'] == 'challenge') {
            $challengeNameValue = isset($data['challenge_name']) ?
                strtoupper($data['challenge_name']) :
                $challengeNameValue;
        } //End if
    @endphp
    ...
    ...
    <div> <!-- Shows the passcode input field for the Password/OTP/TOTP based challenges only  -->
        @stack('cognito-challenge-passcode')
    </div>
    ...
    ...
    <!-- Button with data-action and data-role attribute -->
    <button type="submit"
        data-action="challenge-submit" data-role="">
        Submit</button>
    ...
</form>

@stack('cognito-challenge-scripts')
...
Using this component will simplify the implementation of the passkey authentication functionality in your application.
The data is secure on the client side, as per the FIDO2 standards, and the necessary scripts and methods are provided in the component to implement the passkey feature in your application.
API Documentation
This Laravel Package provides the necessary methods to implement passkey functionality provided by AWS Cognito. The available challenges are dynamically provided from the trait making the user experience aligned to the AWS SDK.
The Email OTP and SMS OTP challenges are simple to implement, as they are based on the challenge initiated by the AWS Cognito User Pool. The WebAuthn challenge is based on the FIDO2 Security Keys and require a registration process to be completed before the user can use the security key or passkey to authenticate.
The package provides a trait WebAuthPasskey that you can add to your controller to make the passkey methods running. The namespace for the trait is Ellaisys\Cognito\Auth\WebAuthPasskey.
The methods provided in the trait are as follows:
- start (Start the registration process)
- complete (Complete the registration process)
- delete (Delete a registered passkey)
- challenge (Authenticate by responding to the passkey authentication challenge)
The package also provides a Controller WebAuthPasskeyController with methods that you can alter. You can publish the controllers using the command below and then use the methods in your controller.
php artisan vendor:publish --provider="Ellaisys\Cognito\Providers\AwsCognitoServiceProvider" --tag="controllers"
This controller uses the trait WebAuthPasskey referenced above.
Passkey Registration with FIDO Authenticator
Alternately, the package also provides API routes that you can use to implement the passkey registration functionality in your application. The API routes are as follows: The passkey registration process involves two steps.
***Step 1*** Register the passkey
The first step is to generate the registration certificate. The library provides a route that calls the start method in the WebAuthPasskey trait to generate the registration certificate. The response will be the registration certificate that can be used to register the passkey with the FIDO Authenticator (navigator.credentials.create).
public function start(Request $request)
{
    ...
} //Function ends
The response for the API call would look like this.
{
    "challenge": "yEAFH***********vfPIZwg",
    "rp": {
        "name": "Application Name",
        "id": "localhost"
    },
    "user": {
        "id": "YzA3M2Uw************************zMGYwN2Zk",
        "name": "johndoe",
        "displayName": "John Doe"
    },
    "pubKeyCredParams": [
        {
            "type": "public-key",
            "alg": -7
        },
        {
            "type": "public-key",
            "alg": -257
        }
    ],
    "timeout": 60000,
    "excludeCredentials": [
        {
            "type": "public-key",
            "id": "hu9Bl-y9fkczpQLT6X40Ww"
        },
        ...
        ...
        {
            "type": "public-key",
            "id": "WScmmw29ENmAC07cQP-kdw"
        }
    ],
    "authenticatorSelection": {
        "requireResidentKey": true,
        "residentKey": "required",
        "userVerification": "preferred"
    }
    ...
}
Send this data to the java script function to register the passkey with the FIDO Authenticator (navigator.credentials.create). it should show a prompt to the user to register the passkey with the FIDO Authenticator. The user can then use the security key or passkey to authenticate.
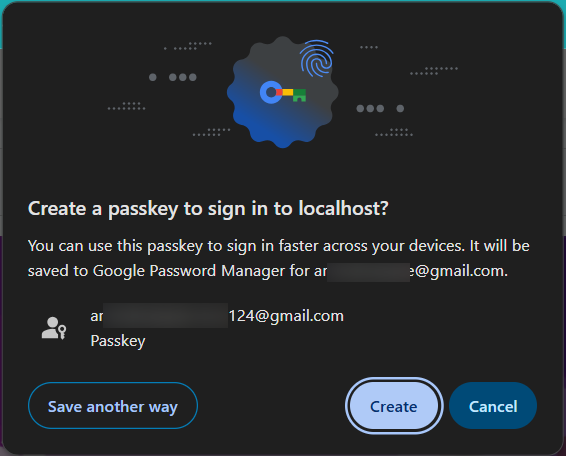
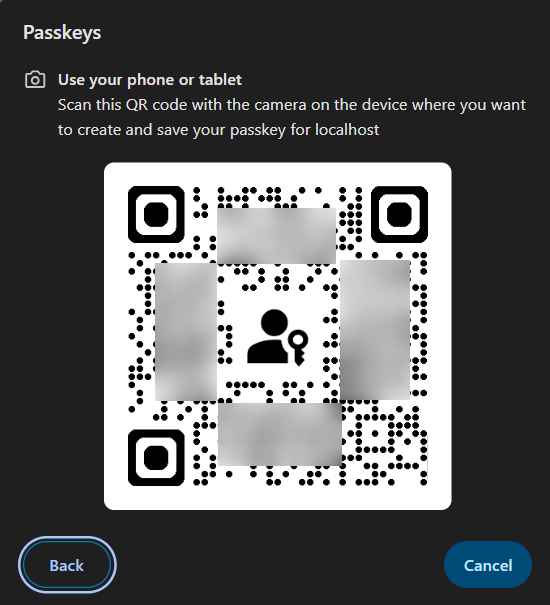
***Step 2*** The response from the FIDO Authenticator will be used in the second step to complete the registration process.
public function complete(Request $request)
{
    ...
} //Function ends
The response for the API call would look like this with the HTTP Status Code 200.
{
    "status": "success"
}
Passkey Authentication Functionality
The package provides API routes that you can use to implement the passkey login functionality in your application.
The login shall require three steps for implementation of the overall authentication using the passkey approach.
***Step 1***: Generate the available challenges.
GET /login/passkey/challenge
Content-Type: application/json
Accept: application/json
{
    "username": "<username_registered_in_cognito_user_pool>"
}
This API will return the available challenges for the user. The response will be as shown below. The challenge name shall be SELECT_CHALLENGE.
{
    ...
    "ChallengeName": "SELECT_CHALLENGE",
    "Session":"AYABeEkKMeJKkzhx3MK-GzS3ISIAH
    QABAAdTZXJ2aWNlABBDb2duaXRvVXNlclBvb2xzAA
    ...
    ...
    jVrz53Y1uJ3I30w46CpL9xlB50IbVJ0SNYY_tuFsLc
    GjYfDpn7XQcd6-fXWovCIYoMH5Q",
    "AvailableChallenges": [
        ...
        "EMAIL_OTP",
        "SMS_OTP",
        "WEB_AUTHN"
    ],
    ...
}
The data in AvailableChallenges attribute will be based on the configuration in the AWS Cognito User Pool and the user’s settings.
[!NOTE] The available challenges will be dynamically provided from the trait based in the verified data in cognito. This makes the the user experience better.
***Step 2***: This step involves generating the challenge based on the selected passkey choice with the session token.
The API endpoint is the same with additional parameter for the challenge name. It is one of the values in the AvailableChallenges array from the previous step. (e.g. WEB_AUTHN).
The route provided allows the challenge name to be passed as a path parameter. The response will be the challenge for the selected passkey choice. The user can then use the security key or passkey to authenticate.
GET /login/passkey/challenge/<challenge_name>
Content-Type: application/json
Accept: application/json
{
    "username": "<username_registered_in_cognito_user_pool>"
}
Note: The challenge name is case insensitive. The available challenges are dynamically provided from the trait making the user experience better. The request payload for the Web and API based route is as shown below.
{
    "challenge_name": "WEB_AUTHN",
    "username": "john@doe.com"
}
The response for the API call would look like this with the HTTP Status Code 200. Based on the challenge name, the necessary data will be provided in the response.
The data in ChallengeParameters will be based on the challengeName provided. The user can then use the security key or passkey to authenticate. The available challenges will be dynamically provided from the trait making the user experience better.
{
    "ChallengeName": "WEB_AUTHN",
    "Session":"AYABeEkKMeJKkzhx3MK-GzS3ISIAH
    QABAAdTZXJ2aWNlABBDb2duaXRvVXNlclBvb2xzAA
    ...
    ...
    jVrz53Y1uJ3I30w46CpL9xlB50IbVJ0SNYY_tuFsLc
    GjYfDpn7XQcd6-fXWovCIYoMH5Q",
    "AvailableChallenges": [
        ...
        ...
        "WEB_AUTHN"
    ],
    "ChallengeParameters": {
        "CREDENTIAL_REQUEST_OPTIONS": "json_string_of_credential_request_options"
    }
}
***Step 3***: This step involves verifying the OTP/TOTP code OR biometric data.
- The Email OTP will be sent to the registered email address of the user.
- The SMS OTP will be sent to the registered mobile number of the user.
- The WebAuthn challenge will be verified using the FIDO Authenticator (navigator.credentials.get) registered with cognito.
The user response will be sent to the API endpoint to verify the challenge. A single API endpoint is provided to verify the challenge response for authentication. The request payload will depend on the challenge name provided in the previous step.
POST /login/challenge
Content-Type: application/json
Accept: application/json
{
    "challenge_name": "<challenge_name>",
    "session": "<session_token_from_previous_step>",
    "challenge_value": "<response_from_user>",
    "challenge_params": "<challenge_params_from_previous_step>",
    "username": "<username_registered_in_cognito_user_pool>"
}
The payload for the Web and API based route is as shown below. The request payload will depend on the challenge name provided in the previous step. The user can then use the security key or passkey to authenticate.
{
    "challenge_name": "WEB_AUTHN",
    "session": "AYABeEkKMeJKkzhx3MK-GzS3ISIAH
    QABAAdTZXJ2aWNlABBDb2duaXRvVXNlclBvb2xzAA
    ...
    ...
    jVrz53Y1uJ3I30w46CpL9xlB50IbVJ0SNYY_tuFsLc
    GjYfDpn7XQcd6-fXWovCIYoMH5Q",
    "challenge_value": "string_response",
    "challenge_params": "json_string_of_credential_request_options",
    "username": "john@doe.com"
}
The response for the API call would look like this with the HTTP Status Code 200.
The response object will contain the access token, refresh token and the id token. The user can then use the access token to access the protected resources in the application.
API Routes
[!NOTE] We are releasing the API predefined routes as a new feature from V1.3.0.
php artisan vendor:publish –provider=”Ellaisys\Cognito\Providers\AwsCognitoServiceProvider” –tag=”controllers”
For the list of published routes and configurations, please refer API Routes